Guide - Migrating a Sandbox Heroku Add-on to Atlas
Migrating a specific Database
D. Complete these tasks in the migration wizard
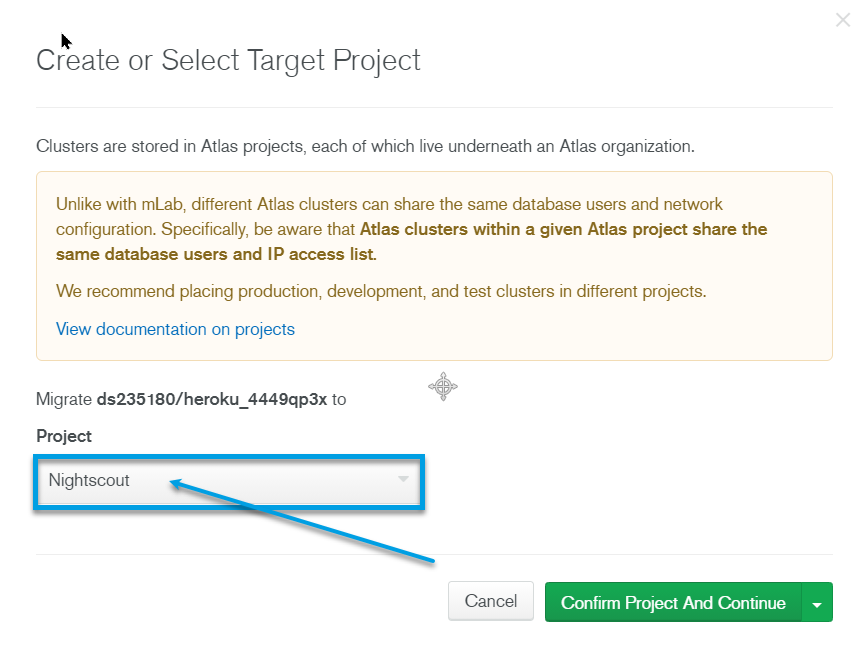
- Step 1. Create target Atlas project
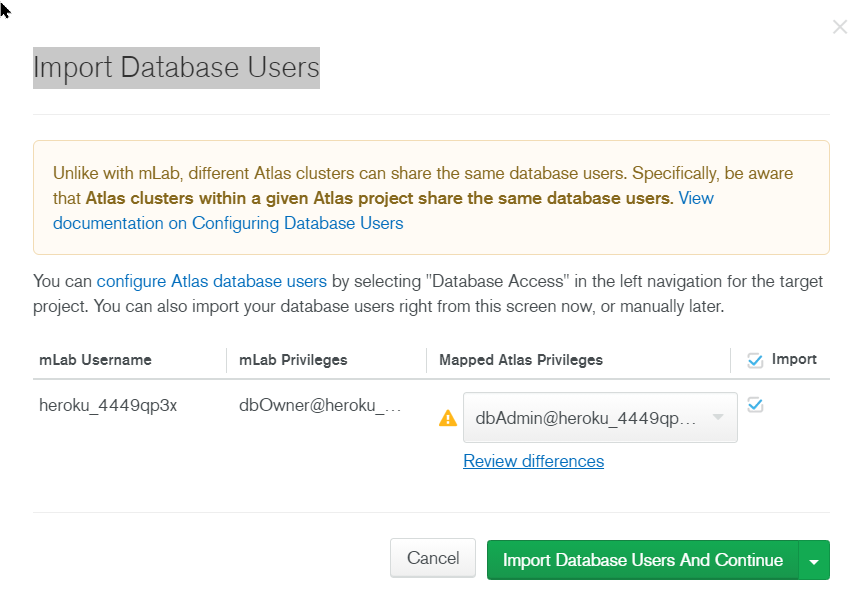
- Step 2. Import database user(s)
- Step 3. Configure an IP whitelist
- Step 4. Create the target Atlas cluster
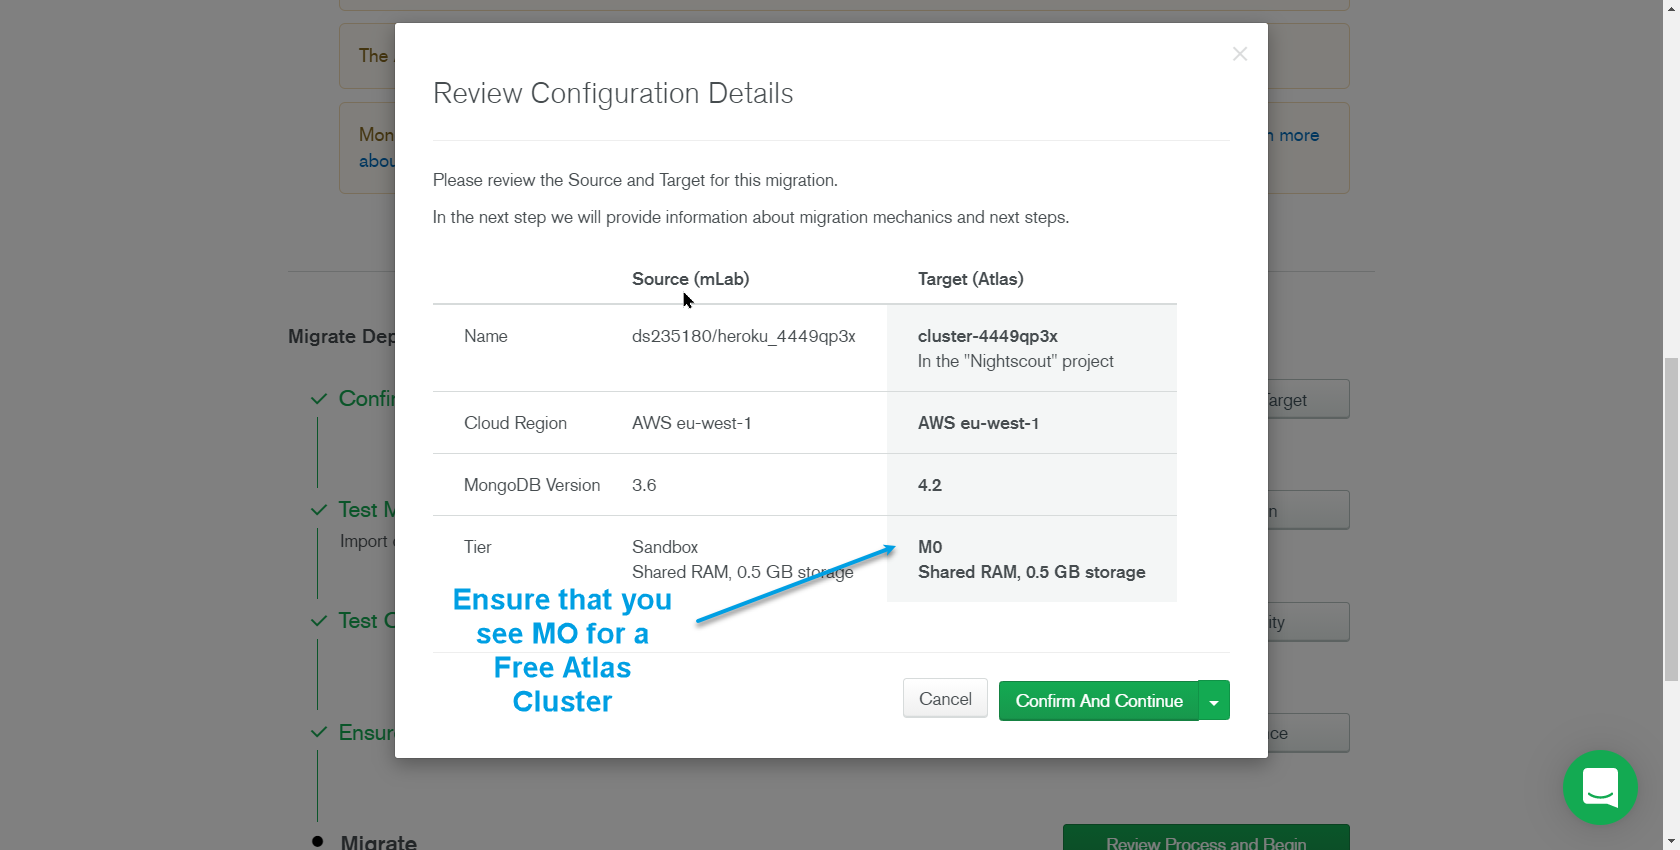
- Step 5. Confirm the source and target
- Step 6. Test the migration
- Step 7. Test connectivity
- Step 8. Ensure independence from the Heroku add-on’s config var
- Step 9. Migrate
- Step 10. Start using Atlas
- Step 11. Delete mLab deployment (instructions only)
Step 1. Create the target Atlas project
Enter a value in the “Project Name” field (e.g., “Nightscout”) and then click on the green “Confirm Project and Continue” button. You will be able to change the name of the project later.

Step 2. Import database user(s)
Click on the green “Import Database Users and Continue” button.

Step 3. Configure an IP whitelist
Check the checkbox to allow all IP addresses and then click on the green “Allow All and Continue” button.
| Note! |
| You will receive an email from MongoDB Atlas with the subject of ‘You’ve added “Allow access from anywhere (0.0.0.0/0)” to your IP Whitelist’. This is expected. |
Step 4. Create the target Atlas cluster
Select “Create most equivalent new cluster” from the drop-down menu. This will expand the modal into a larger screen.
Scroll down and click the green “Confirm Target and Continue” button to create a free Atlas database (M0 tier). It will take about 7-9 minutes for the Atlas database to be created.
| Warning! |
| Unlike mLab, the Atlas M0 (free) tier does not include backups. If backups are important to you, you will need to manually take your own backups (email <a href="mailto:This email address is being protected from spambots. You need JavaScript enabled to view it.">This email address is being protected from spambots. You need JavaScript enabled to view it.</a> for help) or migrate to the Atlas M2 tier which is approximately $9 per month and includes a free daily backup. |
Step 5. Confirm the source and target
Review your info about the source and target to confirm that you’re migrating from and to the correct deployments. If everything looks good, click on the green “Confirm and Continue” button.
| Note! |
| Ensure that you see MO on here if you want to migrate to a free Atlas Cluster. |

Click on the green “Begin Test Run” button.
Note that:
- This step will delete any data existing on the target Atlas cluster and then run a mongo dump on your source mLab database followed by a mongore store into the target Atlas cluster.
- We strongly recommend performing a test run of the migration. The test run will not only give you an estimate for how long the process will take, but it will validate that the process will work for your particular set of data and indexes.
Assuming you have reviewed the Migration Prerequisites, you can skip the instructions in this step and click on the green “Confirm and Continue” button.
Step 8. Ensure independence from the Heroku add-on’s config var
Nightscout users can skip this step completely because the Nightscout code already looks for the existence of a different config var, MONGO_CONNECTION, which we will be creating later. Click on “Confirm and Continue”.
| Warning! |
| This step is the real migration! Clicking “Begin Migration” will change the role of the database user(s) which exist on the source mLab deployment to be read-only. If an unexpected error occurs, and you want to abort the migration process and start using your source mLab deployment again, you will need to recreate the database user(s) on your source mLab deployment through milab’s management portal. Performing a test migration ahead of time will help avoid the need to do this. If you do rollback to mLab, note that any writes that are made to the target Atlas cluster will not exist on the source mLab deployment and will be deleted if you attempt another migration later. You should not start another migration; instead please email This email address is being protected from spambots. You need JavaScript enabled to view it. with a link to your Atlas organization or project for help. |
At this point the import of data and indexes from your source mLab database to the target Atlas cluster is complete.
You can now restart your Nightscout application with the connection string for your Atlas cluster:
- Click on the “Copy” button to copy the connection string to your Atlas cluster into a text editor.
- Log in to Heroku.
- In the Heroku UI, you should see your Nightscout app listed. Click on the row for your Nightscout app to navigate to its management page.
- In the Heroku UI, select the “Settings” tab.
- In the Heroku UI in the “Config Vars” section, click on the “Reveal Config Vars” button.
- In the Heroku UI, find the config var named either “MONGODB_URI” or “MONGOLAB_URI”. Copy the characters in between the “:” character and the “@” character. Those characters make up the database user’s password. In your text editor, replace the <password> placeholder with this password. You now have prepared the Atlas connection string in your text editor.
- Make sure you have not inadvertently added a space before or after the password. The connection string should not have any spaces in it.
- Make sure you do not include the “<” and “>” characters from the password placeholder since those are simply signifying a placeholder value.
- In the Heroku UI at the bottom of the list of config vars, add a brand-new MONGO_CONNECTION config var with the connection string to your Atlas cluster.
- Verify that your Nightscout app is still working. If it is not working, do not start another migration since this will make things worse. Instead, see the Troubleshooting section below.
Step 11. Delete mLab deployment (instructions only)
To delete the source mLab deployment, you will need to delete the Heroku mLab add-on via Heroku’s interface. Once you have deleted the add-on, verify again that your Nightscout app is still working.
Troubleshooting
- I am seeing a “Wrong API secret” message after completing Step 10 (Start Using Atlas). What do I do?
This most likely means that you have multiple mLab databases, and you migrated the wrong one. However, this error can occur for a number of other reasons - please see the last question on this page on how to get help.
- I am seeing “Error: invalid schema, expected mongodb” after Step 10. What do I do?
This means that you did not update your Nightscout site to the latest version (Step 1 of the Migration Prerequisites).
If you did update to the latest Nightscout version, please double-check that you completed Step 12 (the last step) of these version update instructions. This step is important because it will ensure that you have deployed the updated Nightscout version to your Heroku Nightscout application.
Steps to confirm which Nightscout version your app is running:
- Navigate to https://dashboard.heroku.com/apps/nameofyourapp (replace “name of your app” with the name of your Heroku app).
- Click on the “More” button at the upper-right corner and select “Run console”.
- From the form that slides up, click on the “bash” link in blue below the “Run” button and then click on the “Run” button.
- Once you see the “~ $” prompt, carefully type in “npm ls | grep nightscout” like so:
~ $ npm ls | grep nightscout
… then press on the return/enter button on our keyboard. The response will include a string like:
nightscout@13.0.1 / app
In this example, the version of Nightscout deployed to your app is 13.0.1.
- My Nightscout app isn’t working after Step 10. What do I do?
- Do notstart another migration as this will make things worse.
- If you haven’t already, update your Nightscout site to the latest version(Step 1 of the Migration Prerequisites).
- Ensure that the value of the MONGO_CONNECTION config var does not have any spaces in it. This value should start with “mongodb+srv://” if you completed Step 10.
- If you find an issue and fix it, wait a minute to see if your app at https://nameofyourapp.herokuapp.comis now working for you (replace “nameofyourapp” with the name of your Heroku app).
- Ensure that “MONGO_CONNECTION” is spelled correctly (i.e., no typos).
- If you find an issue and fix it, wait a minute to see if your app at https://nameofyourapp.herokuapp.comis now working for you (replace “nameofyourapp” with the name of your Heroku app).
- Reset the database user’s password by visiting the “Database Users” view for your Atlas project and click on the “EDIT” button to change the database user’s password. Then replace the password placeholder (<password>) in the MONGO_CONNECTION config var with the new password.
- Wait 2-3 minutes to see if your app at https://nameofyourapp.herokuapp.comis now working for you (replace “nameofyourapp” with the name of your Heroku app).
For more help, see the next question.
- How do I get help?
The mLab Support team is here to help! Please email This email address is being protected from spambots. You need JavaScript enabled to view it. with:
- A link to your Atlas UI after you are logged in; the link should include “cloud.mongodb.com”.
- The value of the “MONGO_CONNECTION” config var (mask the database password by replacing the text between the “:” and the “@” with “PASSWORD”).
- A link to your Nightscout app; the link should include “herokuapp.com”.